back to blog
 1")
Home Flooring Options: Hardwood vs. Luxury Vinyl Plank (LVP)
The Ultimate Flooring Options Guide: Comparing Hardwood vs. Luxury Vinyl Plank (LVP) for Your Home
Choosing the right flooring for your home is a crucial decision that can impact both the aesthetic and functional aspects of your living space. With a wide array of flooring options available, many homeowners find themselves debating between the timeless appeal of hardwood and the modern versatility of Luxury Vinyl Plank (LVP). Each option offers its own set of benefits and challenges, making the hardwood vs. LVP comparison a key consideration in home improvement projects. This guide aims to provide a comprehensive look at these two popular flooring types, helping you make an informed choice that best suits your lifestyle and budget. Whether you’re drawn to the natural beauty of hardwood or the practical advantages of LVP, understanding the differences will help you in your flooring decision-making process.
Understanding Flooring Options
When it comes to home improvement, flooring plays a crucial role in both aesthetics and functionality. Let’s explore two popular flooring options: hardwood and Luxury Vinyl Plank (LVP).
Exploring Hardwood
 1")
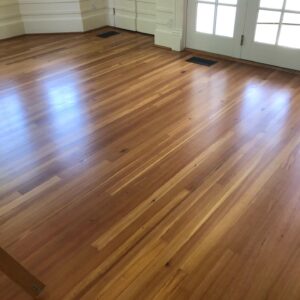
Hardwood flooring has been a staple in homes for centuries, prized for its natural beauty and durability. It’s made from solid wood planks, typically from oak, maple, or walnut trees.
Hardwood comes in various styles, including strip flooring (narrow boards), plank flooring (wider boards), and parquet (geometric patterns). Each type offers a unique look, allowing homeowners to customize their space.
One of the main advantages of hardwood is its ability to be refinished multiple times, extending its lifespan. This feature makes it a long-term investment for many homeowners.
However, hardwood is sensitive to moisture and can be prone to scratches. It requires regular maintenance to keep its pristine appearance, which some homeowners might find demanding.
Delving into LVP
 2")
Luxury Vinyl Plank (LVP) is a modern flooring solution that combines practicality with style. It’s made from multiple layers of vinyl, designed to mimic the look of natural materials like wood or stone.
LVP is known for its water-resistant properties, making it suitable for areas prone to moisture, such as bathrooms or kitchens. This versatility is a significant selling point for many homeowners.
The core of LVP is typically made from rigid materials like stone plastic composite (SPC) or wood plastic composite (WPC). These cores provide stability and durability to the flooring.
LVP also offers easy installation, often featuring click-lock systems that allow for DIY projects. This can be a cost-saving factor for budget-conscious homeowners.
Comparing Aesthetics
When choosing between hardwood and LVP, aesthetics play a crucial role. Both options offer unique visual appeals that can enhance your home’s interior design.
Hardwood’s Natural Appeal
Hardwood flooring brings a timeless elegance to any space. Its natural grain patterns and warm tones create a welcoming atmosphere that many homeowners desire.
Each hardwood plank is unique, showcasing the natural variations in the wood. This results in a one-of-a-kind floor that adds character to your home.
Hardwood can be stained in various colors, from light oak to dark walnut, allowing for customization to match your decor. The ability to sand and refinish also means you can change the color over time.
Over the years, hardwood develops a patina that many find appealing. This aging process can add depth and richness to the wood’s appearance.
However, hardwood can be prone to fading in direct sunlight, which might be a consideration for rooms with large windows or abundant natural light.
LVP’s Versatile Designs
LVP offers a wide range of design options, replicating the look of various materials, including different wood species, stone, and even ceramic tiles.
Advanced printing technologies allow LVP to closely mimic the texture and appearance of natural materials. Some high-end LVP products are almost indistinguishable from real wood or stone at first glance.
LVP comes in a variety of colors and styles, from rustic barn wood to sleek modern designs. This versatility makes it easy to find an option that fits your home’s aesthetic.
Unlike hardwood, LVP maintains its appearance over time without developing a patina. This can be an advantage if you prefer a consistent look throughout the years.
LVP also offers the option of mixing and matching different “wood” looks in a single space, allowing for creative design possibilities that might be impractical with real wood.
Durability and Maintenance
The longevity of your flooring and the effort required to maintain it are important factors to consider when making your choice.
Hardwood’s Longevity
 3")
Hardwood floors are known for their durability and can last for generations when properly maintained. This longevity is one of the main reasons for their enduring popularity.
Regular cleaning with a soft broom or dry mop is usually sufficient for day-to-day maintenance. For deeper cleaning, a damp (not wet) mop with a wood-specific cleaner can be used.
Over time, hardwood may develop scratches or dents, especially in high-traffic areas. However, these can often be addressed through sanding and refinishing, restoring the floor’s original beauty.
Hardwood is sensitive to moisture and humidity changes. It can expand, contract, or warp if exposed to excessive moisture, which is why it’s not recommended for bathrooms or basements.
Despite its durability, hardwood requires some care to maintain its appearance. Using furniture pads, avoiding high heels, and quickly cleaning up spills can help preserve its beauty.
LVP’s Resilience
LVP is engineered for durability and resistance to everyday wear and tear. Its multi-layer construction provides excellent resilience against scratches, dents, and stains.
Cleaning LVP is straightforward – regular sweeping or vacuuming, followed by damp mopping with a mild cleaner, is usually sufficient. Unlike hardwood, LVP can handle wet mopping without damage.
LVP’s water-resistant properties make it suitable for areas prone to spills or moisture, such as kitchens and bathrooms. Some LVP products are even fully waterproof.
While LVP is durable, it can’t be refinished like hardwood. If damaged, individual planks may need to be replaced. However, this is usually a simple process due to the click-lock installation system.
LVP maintains its appearance well over time, resisting fading and wear. This consistent look can be advantageous in high-traffic areas or homes with pets and children.
Cost Considerations
Budget often plays a significant role in flooring decisions. Let’s break down the costs associated with hardwood and LVP.
Evaluating Hardwood Costs
Hardwood flooring is generally more expensive than LVP, both in terms of materials and installation. The cost can vary widely depending on the wood species chosen.
Common hardwood species like oak or maple are more affordable, while exotic woods like mahogany or teak come at a premium. On average, hardwood can cost between $6 to $20 per square foot for materials alone.
Installation costs for hardwood are typically higher due to the skill required. Professional installation can add $4 to $8 per square foot to the total cost.
While the initial investment is higher, hardwood’s longevity can make it cost-effective in the long run. A well-maintained hardwood floor can last 50-100 years or more.
Additional costs to consider include periodic refinishing (every 10-15 years) and potential repairs. These maintenance costs should be factored into the long-term budget.
Analyzing LVP Expenses
LVP is generally more budget-friendly than hardwood, both in terms of material costs and installation. This makes it an attractive option for cost-conscious homeowners.
The cost of LVP can range from $2 to $7 per square foot for materials, depending on the quality and style chosen. Higher-end LVP can cost more but is still usually less expensive than hardwood.
Installation of LVP is often simpler and quicker than hardwood, resulting in lower labor costs. DIY installation is also possible, potentially saving on professional installation fees.
LVP doesn’t require refinishing or extensive maintenance, which can lead to cost savings over time. However, it may need to be replaced entirely after 10-20 years, depending on wear and quality.
When considering costs, factor in the potential need for replacement in the future. While individual LVP planks can be replaced if damaged, a full replacement might be necessary after a couple of decades.
Installation and Convenience
 4")
The ease of installation and overall convenience can significantly impact your flooring decision. Let’s compare hardwood and LVP in these aspects.
Hardwood Installation Process
Installing hardwood flooring is a complex process that often requires professional expertise. Here’s a general overview of the steps involved:
Acclimation: Hardwood needs to acclimate to the room’s temperature and humidity for several days before installation.
Subfloor preparation: The subfloor must be clean, dry, and level.
Installation: Planks are typically nailed or glued down, requiring specialized tools and skills.
Finishing: After installation, the floor often needs to be sanded and finished on-site.
The installation process can be time-consuming, often taking several days to complete. This can disrupt your home life temporarily.
Hardwood installation also produces dust and odors from finishing products, which might be a concern for some homeowners. Proper ventilation is crucial during this process.
LVP’s Easy Installation
LVP is known for its user-friendly installation process, making it a popular choice for DIY enthusiasts. Here’s why LVP installation is considered easier:
No acclimation needed: LVP can often be installed immediately, saving time.
Floating floor system: Many LVP products use a click-lock system, allowing planks to “float” over the subfloor without nails or glue.
Can be installed over existing flooring: In many cases, LVP can be installed directly over existing floors, reducing preparation time.
LVP installation is typically faster than hardwood, often completed in a day or two for an average-sized room. This minimizes disruption to your daily life.
The installation process produces minimal dust and no odors, making it a cleaner option. This can be particularly beneficial for households with allergies or sensitivities.

Contact Us
Fill out the form below and an AG Construction representative will contact you soon.
Contact Us Today


Maryland’s Premier Flooring Company
full-service flooring contractor
Whether you own a home or business, we’re your single source for complete flooring installation services! Our comprehensive services include:
- Hardwood staining, sanding, refinishing, restoration, and more!
- Carpet removal and installation
- Vinyl luxury plank replacement and installation
- Vinyl tile and COREtec installation
- And more!