back to blog


How to Prepare Your Home for Hardwood Floor Installation
Your Ultimate Guide to Home Preparation for Hardwood Floor Installation
Installing hardwood floors is a wonderful way to add both beauty and value to your home, but proper preparation is key to a successful project. Before you roll up your sleeves and dive into the world of hardwood floor installation, it’s important to prepare your space effectively. From clearing out furniture to ensuring your subfloor is in top condition, each step plays a crucial role in the longevity and appearance of your new floors. This guide will walk you through essential home preparation steps and provide practical flooring tips to tackle this rewarding DIY project. Whether you’re a seasoned DIY enthusiast or a first-time renovator, preparing your home properly will help make your hardwood flooring installation a smooth and satisfying endeavor.
Initial Assessment and Planning
Before diving into your hardwood floor installation project, it’s crucial to assess your current situation and plan accordingly. This section covers evaluating your existing flooring, budgeting, and selecting the right hardwood type for your home.
Evaluate Your Current Flooring
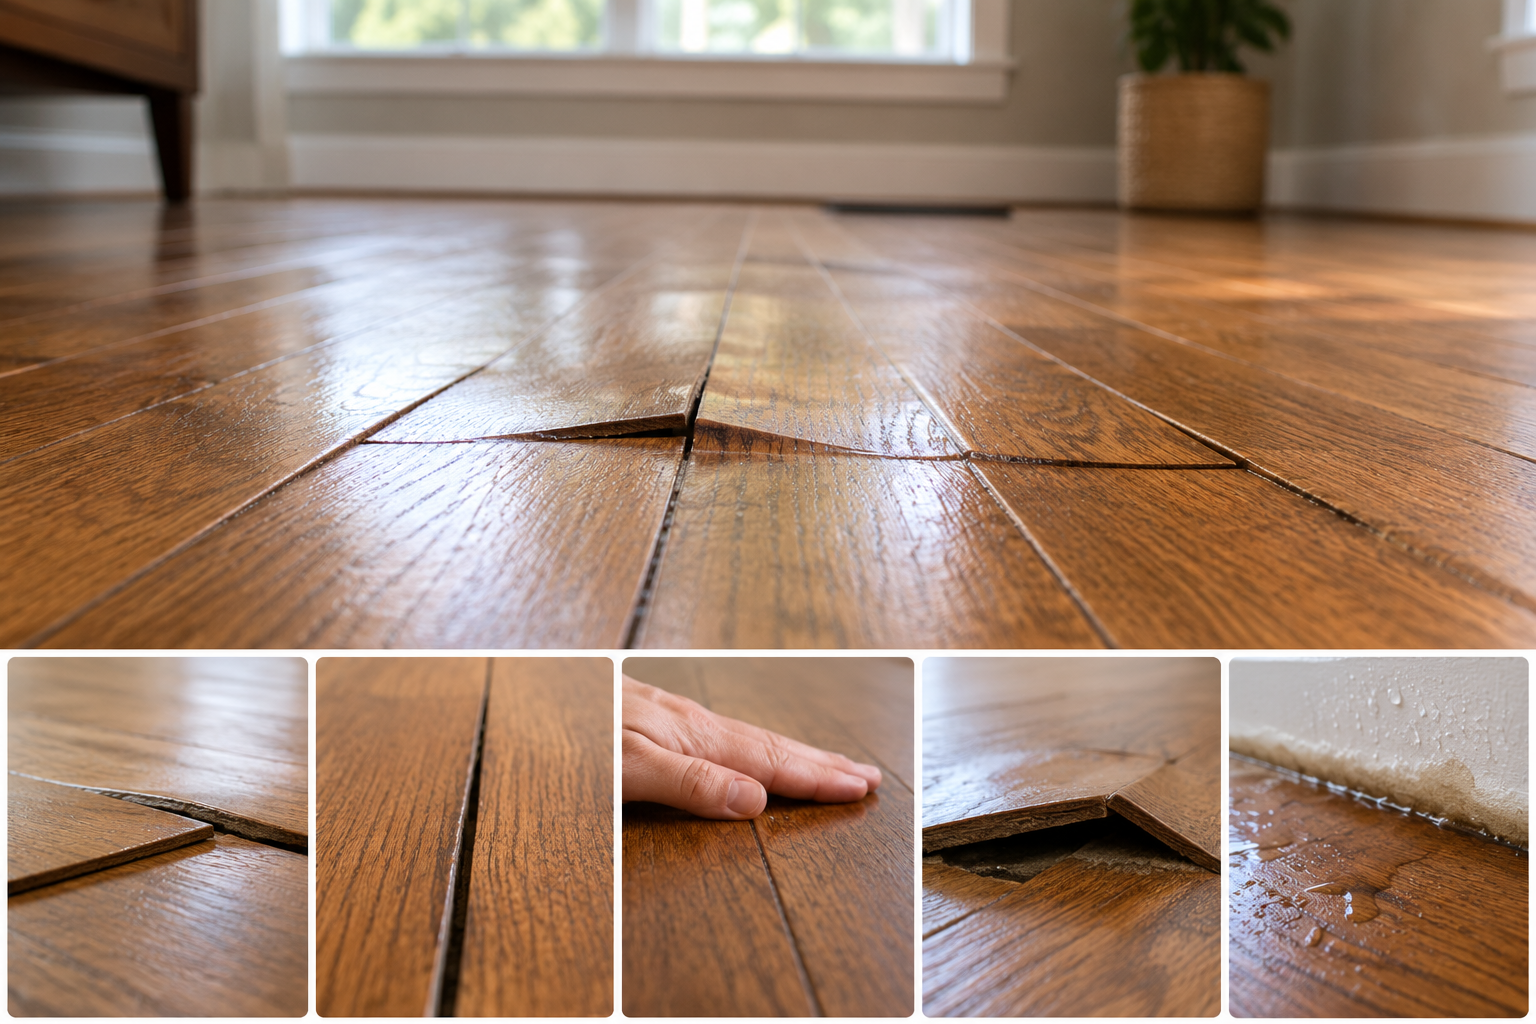
Start by examining your existing flooring to determine the best approach for installation. Look for signs of damage, unevenness, or moisture issues that may need addressing before laying new hardwood.
If you have carpet, check the condition of the subfloor underneath. For tile or vinyl, decide whether to remove it or install over it, considering the impact on floor height and door clearances.
Take note of any areas that may require special attention, such as transitions between rooms or spots with heavy foot traffic. This evaluation will help you plan for potential challenges and ensure a smooth installation process.
Measure and Budget Considerations
Accurate measurements are essential for budgeting and ordering materials. Measure each room’s length and width, accounting for closets and other nooks.
To calculate the square footage, multiply the length by the width of each area. Add 5-10% extra for cutting waste and mistakes. This total will help you estimate material costs and labor if hiring professionals.
Consider additional expenses such as underlayment, trim, tools, and potential subfloor repairs. Factor in the cost of removing and disposing of old flooring if necessary. Creating a comprehensive budget will help you avoid surprises and make informed decisions throughout the project.
Choosing the Right Hardwood Type
Selecting the appropriate hardwood for your home involves considering factors like durability, appearance, and maintenance requirements. Here’s a quick comparison of popular options:
Wood Type | Hardness | Color Range | Price Range |
|---|---|---|---|
Oak | High | Light to medium brown | Moderate |
Maple | Very high | Light cream to reddish brown | Moderate to high |
Cherry | Medium | Reddish brown | High |
Walnut | Medium | Dark brown | High |
Think about your lifestyle and the room’s purpose. High-traffic areas may benefit from harder woods, while bedrooms can accommodate softer options. Also, consider the existing decor and color scheme to ensure your new flooring complements your home’s style.
Preparing Your Home Environment
Creating the right conditions for hardwood floor installation is crucial for a successful project. This section covers clearing the installation area, managing dust and debris, and adjusting your home’s climate for optimal results.
Clearing the Installation Area
Begin by removing all furniture from the rooms where you’ll be installing hardwood flooring. This step ensures a clear workspace and protects your belongings from dust and potential damage.
For larger items that can’t be easily moved, consider using furniture sliders or dollies. If possible, temporarily relocate these pieces to another area of your home or a storage unit.
Remove any floor coverings, including carpets, padding, and tack strips. Pay special attention to baseboards and trim, deciding whether to remove them for a cleaner installation or work around them. A clear, unobstructed space will make the installation process much smoother and more efficient.
Managing Dust and Debris

Hardwood floor installation can generate a significant amount of dust and debris. To minimize the spread of particles throughout your home, take proactive measures to contain the mess.
Seal off doorways and vents in the installation area using plastic sheeting and painter’s tape. This barrier will help prevent dust from migrating to other parts of your house.
Consider setting up a fan near an open window to create negative air pressure, drawing dust out of the room. Have a vacuum cleaner with a HEPA filter on hand to clean up regularly during the installation process.
Adjusting Indoor Climate
Proper acclimatization is crucial for hardwood flooring to prevent future issues like warping or gaps. Adjust your home’s temperature and humidity to match the conditions in which the flooring will typically exist.
Aim for a relative humidity between 35% and 55%, and a temperature between 60°F and 80°F (15°C to 26°C). Maintain these conditions for at least 48 hours before installation and several days after.
Use a hygrometer to monitor humidity levels, and consider using a dehumidifier or humidifier if needed to achieve the ideal range. This preparation will help ensure your new hardwood floors remain stable and beautiful for years to come.
Tools and Materials Checklist

Having the right tools and materials on hand is essential for a smooth hardwood floor installation. This section covers the must-have items for your project, including installation tools, quality materials, and safety gear.
Essential Tools for Installation
A well-equipped toolbox will make your hardwood floor installation much easier. Here’s a list of essential tools you’ll need:
Tape measure and chalk line for accurate measurements and layout
Circular saw or table saw for cutting boards to length
Jigsaw for cutting around obstacles or creating curved edges
Nail gun or flooring nailer for securing boards
Pry bar and hammer for removing old flooring and adjusting boards
Tapping block and pull bar for fitting boards tightly together
Don’t forget smaller items like a carpenter’s square, utility knife, and pencil for marking cuts. If you’re not a frequent DIYer, consider renting some of the larger tools to save on costs.
Gathering Quality Materials
Investing in high-quality materials will ensure a better finish and longer-lasting results. Here’s what you’ll need beyond the hardwood planks themselves:
Underlayment or vapor barrier to protect against moisture
Flooring nails or cleats compatible with your chosen hardwood
Wood filler to conceal nail holes and minor imperfections
Transition strips for doorways and different flooring types
Baseboards and trim to finish the edges of the room
Choose materials that complement your hardwood selection and meet the manufacturer’s recommendations. Quality underlayment and proper fasteners are particularly important for the longevity of your new floor.
Safety Gear and Precautions
Prioritize safety throughout your hardwood floor installation project. Essential safety gear includes:
Safety glasses to protect your eyes from dust and debris
Knee pads for comfort during long periods of kneeling
Dust mask or respirator to avoid inhaling fine particles
Work gloves to protect your hands from splinters and cuts
Ear protection when using loud power tools
Always read and follow the safety instructions for all tools and materials. Keep your work area well-ventilated and take regular breaks to avoid fatigue. By prioritizing safety, you’ll ensure a more enjoyable and incident-free installation process.
DIY Preparation Tips
Proper preparation is key to a successful hardwood floor installation. This section provides valuable DIY tips on floor leveling, subfloor inspection, and moisture testing to ensure your new flooring has a solid foundation.
Floor Leveling Techniques
A level floor is crucial for a professional-looking hardwood installation. Start by checking for unevenness using a long level or straight edge across the floor in multiple directions.
For minor dips and bumps, use a floor leveling compound to smooth out the surface. Apply the compound with a trowel, following the manufacturer’s instructions for drying time.
For more significant unevenness, you may need to sand down high spots or use plywood underlayment to build up low areas. Remember, the goal is to create a flat surface within 3/16 inch over 10 feet for most hardwood installations.
Subfloor Inspection and Repair
Thoroughly inspect your subfloor for any signs of damage or weakness. Look for:
Loose or squeaky boards
Soft spots that may indicate rot
Protruding nails or screws
Gaps between plywood sheets
Address any issues before proceeding with installation. Secure loose boards with screws, replace damaged sections, and ensure all fasteners are properly countersunk. A solid, stable subfloor is essential for the longevity and performance of your new hardwood flooring.
Moisture Testing Procedures
Excess moisture can lead to warping, cupping, or gaps in hardwood flooring. Conduct moisture tests on both the subfloor and the hardwood planks before installation.
For concrete subfloors, use a calcium chloride test or an electronic moisture meter. Wood subfloors can be tested with a pin-type moisture meter. The moisture content of the subfloor should generally be below 12% for wood subfloors or 3 pounds per 1,000 square feet per 24 hours for concrete.
Test the hardwood planks as well, aiming for a moisture content within 2% of the subfloor’s reading. Proper acclimation of the wood to your home’s environment is crucial for achieving this balance.
Professional Assistance and Support
While many homeowners successfully install hardwood floors as a DIY project, sometimes professional help is necessary. This section covers when to seek expert assistance, understanding warranties, and maintaining your new floors.
When to Call a Professional
Consider hiring a professional installer if you encounter any of these situations:
Complex room layouts or intricate patterns
Structural issues with the subfloor
Large-scale installations covering multiple rooms
Limited time or DIY experience
Professionals can often complete the job more quickly and with fewer mistakes. They also have specialized tools and expertise to handle unexpected challenges. If you’re unsure about any aspect of the installation, it’s better to consult with a pro than risk costly errors.
Understanding Installation Warranties
Many hardwood flooring products come with warranties, but these often have specific requirements for installation. Read the warranty terms carefully before starting your project.
Some key points to consider:
DIY installation may void certain warranties
Specific subfloor preparation methods may be required
Moisture testing and acclimation periods are often mandatory
Using recommended adhesives or fasteners may be necessary
Keep all receipts and documentation related to your flooring purchase and installation. This information will be crucial if you need to make a warranty claim in the future.
Post-Installation Care and Maintenance
Proper care after installation will help your new hardwood floors look beautiful for years to come. Here are some essential maintenance tips:
Wait at least 24 hours before walking on newly installed floors
Avoid heavy furniture or appliances for several days
Use felt pads under furniture legs to prevent scratches
Clean regularly with a soft broom or dry mop
Use manufacturer-recommended cleaning products only
Establish a routine care schedule and be proactive about addressing spills or scratches. With the right maintenance, your hardwood floors will continue to enhance your home’s beauty and value for decades.
Contact Us
Fill out the form below and an AG Construction representative will contact you soon.
Contact Us Today


Maryland’s Premier Flooring Company
full-service flooring contractor
Whether you own a home or business, we’re your single source for complete flooring installation services! Our comprehensive services include:
- Hardwood staining, sanding, refinishing, restoration, and more!
- Carpet removal and installation
- Vinyl luxury plank replacement and installation
- Vinyl tile and COREtec installation
- And more!